

How To Validate Registered Users In Django
- Customize the user database model
- Ask for additional information in the user registration page
- Transport and cheque SMS verification codes with the Twilio Verify service
- Prevent access to parts of the application to users that oasis't verified their accounts
- Python 3.six or newer. If your operating system does not provide a Python interpreter, yous can go to python.org to download an installer.
- A Twilio account. If you are new to Twilio click hither to create a complimentary account at present and receive $10 credit when yous upgrade to a paid business relationship. You can review the features and limitations of a gratis Twilio business relationship.
- A phone with an active cellular service and SMS capability, to examination the project.
- The Django framework, to create the web awarding.
- The Twilio Python Helper library, to work with the Twilio Verify service.
- The python-dotenv packet, to import configuration values as environment variables.
- Add together an option to resend the verification code. This can be a very useful addition, because Twilio Verify codes expire after x minutes.
- Alter the project to require a phone verification stride after each log in instead of only after the user registers a new account. This is substantially a course of two-gene hallmark (2FA).
- Give the user the option to receive the code via phone telephone call.
How to Verify Phone Numbers in a Django Awarding with Twilio Verify
When edifice a user registration and authentication system for your web application, you run the run a risk of non properly detecting fake or duplicate accounts. A very constructive way to reduce this risk is to require users to verify their accounts correct after they register.
In this tutorial I'm going to testify you how to extend the Django authentication organisation to include an SMS verification step in the user registration menses, using the Twilio Verify service. Among other things, you will learn how to:
Prepare to begin? Let'southward go!
Prerequisites
To follow this tutorial you need the following items:
Project setup
This tutorial will show you how to build this projection pace-by-step. If you adopt to download or clone the complete projection instead, see the django-verify repository on GitHub.
In this section you lot are going to set a brand new Django project. To keep things nicely organized, open up a terminal or control prompt, find a suitable place and create a new directory where the project you are about to create will live:
mkdir django-verify cd django-verify Creating a virtual surroundings
Post-obit Python best practices, you are going to create a virtual environment to install the Python dependencies needed for this project.
If you are using a Unix or Mac Bone arrangement, open up a terminal and enter the following commands to create and activate your virtual environment:
python3 -m venv venv source venv/bin/activate If y'all are following the tutorial on Windows, enter the following commands in a command prompt window:
python -chiliad venv venv venv\Scripts\activate Now you are ready to install the Python dependencies used by this project:
pip install django twilio python-dotenv The two Python packages that are needed by this project are:
Creating a Django projection
In this step you are going to create a brand new Django spider web application. Enter the following commands in the same terminal you used to create and actuate the virtual environment:
django-admin startproject config . django-admin startapp core The first command to a higher place creates a Django project and puts the project configuration files in the config subdirectory. The next control defines a Django application called cadre. After you run this second command, you will also meet a subdirectory with that name added to the project. This is where yous volition build the logic that registers, logs in, and verifies users.
In the previous section, the python-dotenv package was installed. This package is very useful to import configuration information into environment variables. To integrate it with the Django application, add it to the manage.py file, as shown beneath:
#!/usr/bin/env python """Django's command-line utility for authoritative tasks.""" import os import sys from dotenv import load_dotenv # ← new def main(): """Run authoritative tasks.""" load_dotenv() # ← new os.environ.setdefault('DJANGO_SETTINGS_MODULE', 'config.settings') endeavor: from django.cadre.direction import execute_from_command_line except ImportError as exc: raise ImportError( "Couldn't import Django. Are yous sure it's installed and " "available on your PYTHONPATH environs variable? Did you lot " "forget to activate a virtual surround?" ) from exc execute_from_command_line(sys.argv) if __name__ == '__main__': main() With this add-on, the Django application will automatically import configuration variables from a file named .env located in the project directory. This file does not exist yet, but y'all will be adding it in a moment.
Twilio Verify service configuration
You are at present going to configure the Verify service in your Twilio business relationship. Yous volition demand this service near the end of the tutorial, but information technology is best to become this washed now and take it out of the way.
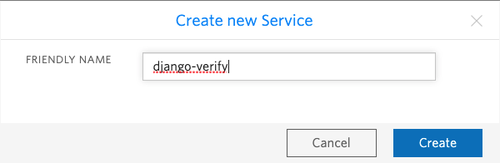
Log in to your Twilio Console and type Verify in the search box. Once in the Verify section of the console, click on Services. This page shows the listing of verification services currently in use. In the context of Twilio Verify, a "service" is an entity that represents an awarding that requires verification. Click the "Create Service Now" push button or the blueish "+" push button to create a new service, and so enter a friendly name for it. For example, django-verify.
Note that the proper name that yous choose for your service volition appear in the SMS messages that are sent to users when they are verified.
The Verify service that you create will exist assigned a "Service SID" and shown in the Full general Settings folio for the service:
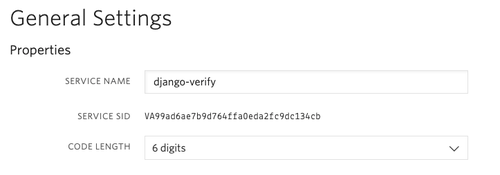
Re-create the SID assigned to the Verify service to the clipboard, and then paste information technology into a new file chosen .env (note the leading dot) every bit follows:
TWILIO_VERIFY_SERVICE_SID=XXXXX Replace XXXXX with your assigned SID.
In addition to the Service SID, to work with Verify you lot also demand your Twilio account SID and Auth Token, which you can get from the Twilio Panel folio:
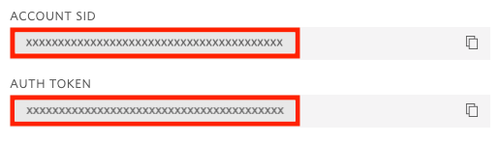
Open up the .env file once again and add together two more variables as shown below:
TWILIO_VERIFY_SERVICE_SID=XXXXX TWILIO_ACCOUNT_SID=XXXXX TWILIO_AUTH_TOKEN=XXXXX I suggest that yous go over all the configuration settings for your Verify service. On this page you can change the length of the numeric codes, which delivery channels you want to use, and more than.
Adding a homepage
To make certain that everything is in order, you are going to add a homepage to this project. The view is going to be called index, and will only render a template. Enter the following lawmaking in core/views.py:
from django.shortcuts import return def index(request): render return(request, 'index.html') The templates of this application are going to exist stored in a templates subdirectory. Create this directory now:
Django needs to be configured to look for templates in this directory. Open file config/settings.py, find the TEMPLATES dictionary, and edit the DIRS key as follows:
TEMPLATES = [ { 'BACKEND': 'django.template.backends.django.DjangoTemplates', 'DIRS': [BASE_DIR / 'templates'], # ← edit this line 'APP_DIRS': True, 'OPTIONS': { 'context_processors': [ 'django.template.context_processors.debug', 'django.template.context_processors.request', 'django.contrib.auth.context_processors.auth', 'django.contrib.letters.context_processors.letters', ], }, }, ] Next, you'll create a base template that volition ascertain the page layout of the application. Create a file named base.html in the templates directory and enter the post-obit HTML code in it:
<!doctype html> <html> <head> <title>Django and Twilio Verify Demo</championship> </head> <body> {% block content %}{% endblock %} </trunk> </html> Now create the homepage HTML template in a file called alphabetize.html, besides located in the templates folder:
{% extends 'base.html' %} {% block content %} <h1>Django and Twilio Verify Demo</h1> <p>Hi!</p> {% endblock %} The core awarding needs to define its listing of public URLs (but ane and then far). Create a file named core/urls.py and enter the following code in information technology:
from django.urls import path from . import views urlpatterns = [ path('', views.index, name='index'), ] The URL definition in a higher place needs to be added to the projection-wide URL configuration. Open file config/urls.py and enter the following definitions:
from django.contrib import admin from django.urls import path, include urlpatterns = [ path('admin/', admin.site.urls), path('', include('core.urls')), ] Running the application
A very basic version of the Django application is now set to be tested. Get dorsum to your terminal and start the spider web server with the following command:
python manage.py runserver The output of this control will include some warnings in cherry regarding database migrations that haven't been applied. Since the application does not need a database even so, it is safe to ignore this error for at present. The database volition be created in the adjacent section and at that point, this warning will go abroad.
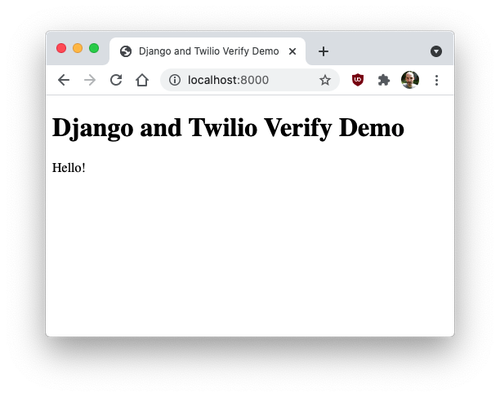
Type http://localhost:8000 into the address bar of your web browser to confirm that your Django project is upwards and running. This is what y'all should see:
User model
The default User model provided by Django has the expected username and password fields already divers, but in this project users will need to provide their phone number for verification purposes. For that reason, the user model needs to be customized.
Open the file cadre/models.py and enter the following code in it:
from django.db import models from django.contrib.auth.models import AbstractUser class User(AbstractUser): phone = models.TextField(max_length=20, bare=False) is_verified = models.BooleanField(default=False) This is an extended User model that inherits from the default base user implemented by Django. The ii fields in this model are added to those that be in the base form. The phone field is going to store the phone number provided past the user, and the is_verified field is going to be useful for the application to cheque the verification status.
Now we demand to tell Django that we want to use this model instead of the default one. Open config/settings.py, notice the INSTALLED_APPS lexicon, and add the cadre application as a last element:
INSTALLED_APPS = [ 'django.contrib.admin', 'django.contrib.auth', 'django.contrib.contenttypes', 'django.contrib.sessions', 'django.contrib.messages', 'django.contrib.staticfiles', 'core', # ← new ] Then scroll down to the end of the file and add together the post-obit variable:
AUTH_USER_MODEL = 'core.User' Save the settings file. The concluding step is to generate a database migration to add the changes in the new User model to the application's database:
python manage.py makemigrations python manage.py migrate The makemigrations command looks at the model definitions in the application and generates a database migration script that includes the new User model we created higher up. The migrate control then initializes the Django database by applying all the database migrations.
If you are yet running the Django web server from the previous section, stop it past pressing Ctrl-C and then restart it. From now on and until the finish of this tutorial, y'all can leave the Django spider web server running while y'all proceed working. Every time you make edits to the source code, the server will automatically update itself and restart to incorporate the changes.
Registration folio
The user model is now configured to accept a phone number in addition to the standard fields required by the Django authentication system. To request the phone number from the user during registration, the registration page needs to be customized.
Let'south brainstorm past writing the user registration view. Open up core/views.py in your text editor or IDE and add the annals view:
from django.shortcuts import render, redirect from .forms import UserCreationForm def alphabetize(request): return render(asking, 'index.html') def register(request): if request.method == 'Mail service': form = UserCreationForm(request.POST) if form.is_valid(): form.save() render redirect('index') else: form = UserCreationForm() return render(request, 'register.html', {'course': form}) The registration view works with a form object of class UserCreationForm. This view will be called as a GET request when the registration page needs to be displayed, and as a POST request when the user is submitting their data through the course.
In the GET asking case an empty course object is created and rendered to the page, through the register.html template. For the Mail service asking, the class is validated, the user's information is saved to the database, and finally the user is redirected to the alphabetize page.
This view uses two things that practice not exist yet: the form class and the HTML template. You'll ascertain the form class in a new file yous'll demand to create called core/forms.py:
from django import forms from django.contrib.auth.forms import UserCreationForm as BaseUserCreationForm from .models import User class UserCreationForm(BaseUserCreationForm): telephone = forms.CharField(max_length=20, required=True, help_text='Phone number') course Meta: model = User fields = ('username', 'phone', 'password1', 'password2') There is no need to create a full form for this form, considering Django's auth module provides a user registration form that simply needs the phone number added. Then for this form, the UserCreationForm from Django is used as a base class, and only the phone field is defined as an extension to the default fields. The form class needs to include a reference to the user model class, and the complete listing of fields that will be presented to the user.
The last chemical element that is necessary to complete the user registration flow is to create the HTML template that will render the folio in the browser. Create a templates/register.html file and re-create the following contents to information technology:
{% extends 'base.html' %} {% block content %} <h1>Register</h1> <form method="mail"> {% csrf_token %} {{ grade.as_p }} <button type="submit">Register</button> </form> {% endblock %} To brand the registration folio part of the application, add a /register/ URL to the core application. This is the updated core/urls.py file:
from django.urls import path from . import views urlpatterns = [ path('', views.index, name='index'), path('register/', views.register), # ← new entry ] Make certain the Django web server is running and so open http://localhost:8000/register/ in your web browser to run across the registration page in action:
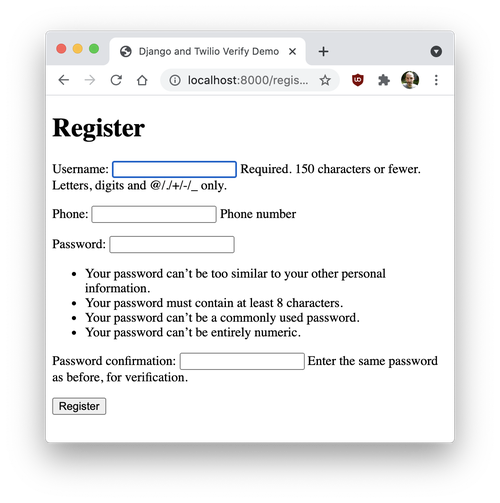
This is great, right? The styling is simple considering no CSS classes have been added, but Django provides a very robust registration page, to which this projection just adds the phone field.
Desire to know the best thing most this class? Information technology is already hooked up with the database to register new users, thanks to all the logic inherited from the Django base course course. If you lot fill up out the form and press the "Register" button, the new user will exist added to the database. But go along in heed that after the user form submission is accepted and saved, the user is redirected to the alphabetize page, which currently doesn't have any concept of a logged in user. In the side by side department y'all'll add together the login and logout flows.
Login and Logout pages
To be able to piece of work with logged in users the application needs to have content that is only available later on the user logs in. With the next change, yous'll protect the index folio so that it redirects unauthenticated users to a login page. Below you can see an updated core/views.py with the changes highlighted:
from django.contrib.auth.decorators import login_required from django.shortcuts import return, redirect from .forms import UserCreationForm @login_required def index(request): return render(request, 'alphabetize.html') def register(request): if asking.method == 'Postal service': class = UserCreationForm(request.Post) if course.is_valid(): class.save() return redirect('alphabetize') else: form = UserCreationForm() render return(request, 'register.html', {'form': form}) As you tin can see, protecting a view and so that only logged in users tin can access it merely requires calculation the login_required decorator, which comes built-in with Django. This decorator volition let users that are logged in access the view, only will redirect users who are not logged in to a login page. The URL of the login page is configured in config/settings.py. Add the following line at the lesser of the file:
The alphabetize.html template can now be expanded to show the username of the logged in user with a push to log out of the application. Here is the updated template:
{% extends 'base.html' %} {% cake content %} <h1>Django and Twilio Verify Demo</h1> <p>Hello {{ request.user.username }}, you are a verified user!</p> <course method="Postal service" activeness="/logout/"> {% csrf_token %} <input type="submit" value="Log out"> </form> {% endblock %} The login and logout views are provided past Django. All that is required is to define URLs for these two views. Here is the updated cadre/urls.py:
from django.urls import path from django.contrib.auth import views as auth_views from . import views urlpatterns = [ path('', views.alphabetize, name='index'), path('register/', views.register), path('login/', auth_views.LoginView.as_view(template_name='login.html')), path('logout/', auth_views.LogoutView.as_view(template_name='logout.html')), ] The ii new views need templates, given in the template_name arguments. Create a new file chosen templates/login.html. This template receives a form variable set to the login course and renders it to the page:
{% extends 'base.html' %} {% block content %} <h1>Log in</h1> <form method="post"> {% csrf_token %} {{ form.as_p }} <button type="submit">Log in</button> </class> <p>Don't have an account? <a href="/register/">Register</a> at present!</p> {% endblock %} Note that as a nice touch, the login page includes a link to the registration folio congenital earlier.
The templates/logout.html template just tells the user that they have been logged out, and offers a link to the index page. Create this file, then paste the post-obit lawmaking into it:
{% extends 'base of operations.html' %} {% block content %} <h1>You are logged out</h1> <p><a href="/">Dwelling house</a></p> {% endblock %} With these changes, a basic user registration and login system is now in place. Ready to try it out? Make sure the Django web server is running, and so open up a browser tab on the http://localhost:8000 URL. Since this URL is now protected by the login_required decorator, Django will send you to the login page, where you tin enter your username and password to gain admission. If you haven't registered an account all the same, click on the "Register" link to do it at present.
Phone verification
The projection is now able to register, login, and logout users. The concluding part of this tutorial is to add together the SMS verification every bit an additional step right later on registering. Registered users will be able to log in and out of the awarding, merely they won't exist able to access the index page until they verify their accounts.
Integration with Twilio Verify
The most convenient way to integrate the Django application with Twilio Verify is to create a verify.py module in the cadre directory that implements the two functions of the service needed by the application. The get-go function sends a verification code to the user, while the 2d function checks a verification code once the user provides it back to the application.
Here is the core/verify.py module:
import os from twilio.remainder import Client from twilio.base.exceptions import TwilioRestException client = Client(bone.environ['TWILIO_ACCOUNT_SID'], os.environ['TWILIO_AUTH_TOKEN']) verify = client.verify.services(os.environ['TWILIO_VERIFY_SERVICE_SID']) def send(phone): verify.verifications.create(to=phone, channel='sms') def check(phone, lawmaking): effort: event = verify.verification_checks.create(to=phone, code=code) except TwilioRestException: impress('no') return False render consequence.status == 'approved' The two functions that the application will utilise to interface with the Verify service are going to be ship() and bank check().
Sending a verification code
To ship a verification lawmaking to the user, the application needs to telephone call the transport() part defined above and pass the telephone number of the user as the simply argument. This can be done in the registration view, immediately afterward the user is saved to the database. Hither is the updated code for core/views.py:
from django.contrib.auth.decorators import login_required from django.shortcuts import return, redirect from .forms import UserCreationForm from . import verify @login_required def index(request): return render(request, 'index.html') def annals(asking): if request.method == 'Mail service': form = UserCreationForm(request.POST) if form.is_valid(): grade.salvage() verify.transport(form.cleaned_data.get('phone')) return redirect('index') else: form = UserCreationForm() return return(request, 'register.html', {'form': course}) With this small addition, each time a user is registered, a lawmaking will be sent by SMS to the phone number entered during registration. Here is the lawmaking that I received when I registered a new user with my phone number:

Twilio likes to meet phone numbers given in Due east.164 format, which includes a plus sign prefix and the state code. As an example, a number from the United States would be given every bit +1AAABBBCCCC', where AAA is the area code and BBB-CCCC` is the local number. In a real world awarding, the phone field in the form will ensure that the number is formatted correctly. In this instance application you'll have to enter the number in the correct format.
If you are using a Twilio trial business relationship, remember that Twilio but sends SMS to phone numbers that are verified on the business relationship. This restriction does not exist in paid accounts.
Accepting a verification code from the user
The user is now receiving a code past SMS, so the side by side footstep is to create a road that the user can employ to input this number to get information technology verified. Add together the following function to the core/views.py file:
from django.contrib.auth.decorators import login_required from django.shortcuts import render, redirect from .forms import UserCreationForm, VerifyForm from . import verify # ... no changes to index() and register() view functions @login_required def verify_code(request): if asking.method == 'Post': form = VerifyForm(asking.POST) if form.is_valid(): code = form.cleaned_data.get('lawmaking') if verify.check(request.user.phone, lawmaking): asking.user.is_verified = True request.user.save() return redirect('index') else: form = VerifyForm() return render(request, 'verify.html', {'course': form}) The verify_code view volition display a VerifyForm when it executes every bit a GET request, and volition accept a lawmaking from the user when executing as a Postal service request. In the latter case, the code that is received from the user is sent to the verify.check() part, and if the verification succeeds, the user model'south is_verified aspect is prepare to True and saved.
Add together the grade class used by this view at the bottom of core/forms.py module:
class VerifyForm(forms.Class): code = forms.CharField(max_length=viii, required=True, help_text='Enter code') This form has just one field, where the user enters the numeric lawmaking received by SMS.
The form volition be rendered as part of an HTML page. Create a file chosen templates/verify.html which defines the layout of this page:
{% extends 'base.html' %} {% block content %} <h1>Verify your business relationship</h1> <course method="post"> {% csrf_token %} {{ grade.as_p }} <button type="submit">Verify</push> </class> {% endblock %} Finally, a URL needs to exist defined for this new view. Beneath is the updated cadre/urls.py file:
from django.urls import path from django.contrib.auth import views equally auth_views from . import views urlpatterns = [ path('', views.alphabetize, proper noun='alphabetize'), path('register/', views.annals), path('login/', auth_views.LoginView.as_view(template_name='login.html')), path('logout/', auth_views.LogoutView.as_view(template_name='logout.html')), path('verify/', views.verify_code), # ← new ] With the application in its current country you tin already bank check how the verification codes work. Navigate to http://localhost:8000/register/ on your browser and create a new user account, using your phone number in the E.164 format. Once the registration is complete y'all will receive an SMS with the numeric lawmaking that verifies your new account.
Now navigate to http://localhost:8000/verify/, log into the awarding with the new business relationship, and finally enter the verification code. If you enter an invalid code, the form will display again. Once you enter the correct code you volition exist redirected to the alphabetize folio.
Preventing access to unverified accounts
The verification solution is working corking, merely it is not integrated into the registration flow yet. In this section you are going to add the final fleck of functionality to create a seamless experience for the new user.
You've seen Django'southward login_required decorator, which prevents access to a page when the user is non logged in. Now you will create a second decorator called verification_required that will work in a like way, but will redirect the user to the verification page when the business relationship hasn't been verified yet. Enter the following code in a new file called core/decorators.py:
from django.contrib.auth.decorators import user_passes_test def verification_required(f): return user_passes_test(lambda u: u.is_verified, login_url='/verify')(f) This decorator uses the same logic that login_required uses, but it checks the is_verified attribute of the user instead of is_authenticated, and redirects to the /verify/ folio instead of /login/ .
Add the new decorator to the index()` function in core/views.py:
from django.contrib.auth.decorators import login_required from django.shortcuts import render, redirect from .forms import UserCreationForm, VerifyForm from . import verify from .decorators import verification_required # ← new @login_required @verification_required # ← new def alphabetize(request): return render(request, 'index.html') # ... no changes beyond this point With this small change, admission to the alphabetize folio is now prevented if the user'due south is_verified attribute is Faux. When the user logs in and is redirected to this folio, the decorator will intercept the request and instead redirect to the verification page, giving the user a gamble to verify the business relationship before they are allowed to access the page.
Defining the login_required and verification_required decorators separately gives the application control over what pages just require a login and what pages require the account to exist verified.
Next steps
I hope y'all constitute this tutorial useful! If you lot are looking for ideas on how to extend the projection, hither are some:
To learn near all the Twilio Verify service has to offer, cheque out the documentation.
I'd love to see what you build with Django and Twilio Verify!
Miguel Grinberg is a Main Software Engineer for Technical Content at Twilio. Attain out to him at mgrinberg [at] twilio [dot] com if yous have a cool projection you'd similar to share on this weblog!

How To Validate Registered Users In Django,
Source: https://www.twilio.com/blog/verify-phone-numbers-django-twilio-verify
Posted by: kuntzhowestrin.blogspot.com
0 Response to "How To Validate Registered Users In Django"
Post a Comment